| JavaFX 选择框 | 您所在的位置:网站首页 › java 下拉框添加图片 › JavaFX 选择框 |
JavaFX 选择框
|
JavaFX教程 - JavaFX 选择框 JavaFX框允许用户在几个选项之间快速选择。 创建一个选择框我们可以使用ChoiceBox中的consturctors来创建ChoiceBox对象。 以下代码显示了如何使用其构造函数创建和填充选择框。列表项是从可观察列表创建的。 ChoiceBox cb = new ChoiceBox(FXCollections.observableArrayList("A", "B", "C"));我们也可以使用一个空的选择框使用它的默认构造函数,并使用setItems方法设置列表项。 ChoiceBox cb = new ChoiceBox(); cb.setItems(FXCollections.observableArrayList( "A", "B", new Separator(), "C", "D") );上面的代码还将一个分隔符对象添加到选择框。分隔符控件分隔项目。 例子import javafx.application.Application; import javafx.beans.value.ChangeListener; import javafx.beans.value.ObservableValue; import javafx.collections.FXCollections; import javafx.geometry.Insets; import javafx.geometry.Pos; import javafx.scene.Group; import javafx.scene.Scene; import javafx.scene.control.ChoiceBox; import javafx.scene.control.Label; import javafx.scene.control.Tooltip; import javafx.scene.layout.HBox; import javafx.scene.paint.Color; import javafx.scene.shape.Rectangle; import javafx.stage.Stage; public class Main extends Application { Rectangle rect = new Rectangle(150, 30); final Label label = new Label("Hello"); public static void main(String[] args) { launch(args); } @Override public void start(Stage stage) { Scene scene = new Scene(new Group()); scene.setFill(Color.ALICEBLUE); stage.setScene(scene); stage.show(); stage.setWidth(300); stage.setHeight(200); label.setStyle("-fx-font: 25 arial;"); label.setLayoutX(40); rect.setStroke(Color.BLUE); rect.setStrokeWidth(3); rect.setFill(Color.WHITE); final String[] greetings = new String[] { "A", "B", "C", "D", "E" }; final ChoiceBox cb = new ChoiceBox( FXCollections.observableArrayList("a", "b", "c", "d", "e")); cb.getSelectionModel().selectedIndexProperty() .addListener(new ChangeListener() { public void changed(ObservableValue ov, Number value, Number new_value) { label.setText(greetings[new_value.intValue()]); } }); cb.setTooltip(new Tooltip("Select the language")); cb.setValue("English"); HBox hb = new HBox(); hb.getChildren().addAll(cb, label); hb.setSpacing(30); hb.setAlignment(Pos.CENTER); hb.setPadding(new Insets(10, 0, 0, 10)); ((Group) scene.getRoot()).getChildren().add(hb); } }上面的代码生成以下结果。 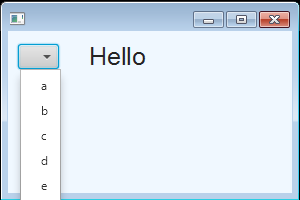 例2 例2以下代码显示了如何在ChoiceBox中填充数据。 import javafx.application.Application; import javafx.collections.FXCollections; import javafx.collections.ObservableList; import javafx.scene.Cursor; import javafx.scene.Scene; import javafx.scene.control.ChoiceBox; import javafx.scene.control.ChoiceBoxBuilder; import javafx.scene.layout.VBox; import javafx.scene.text.Font; import javafx.scene.text.Text; import javafx.stage.Stage; import javafx.stage.StageStyle; public class Main extends Application { ObservableList cursors = FXCollections.observableArrayList( Cursor.DEFAULT, Cursor.CROSSHAIR, Cursor.WAIT, Cursor.TEXT, Cursor.HAND, Cursor.MOVE, Cursor.N_RESIZE, Cursor.NE_RESIZE, Cursor.E_RESIZE, Cursor.SE_RESIZE, Cursor.S_RESIZE, Cursor.SW_RESIZE, Cursor.W_RESIZE, Cursor.NW_RESIZE, Cursor.NONE ); @Override public void start(Stage stage) { ChoiceBox choiceBoxRef = ChoiceBoxBuilder.create() .items(cursors) .build(); VBox box = new VBox(); box.getChildren().add(choiceBoxRef); final Scene scene = new Scene(box,300, 250); scene.setFill(null); stage.setScene(scene); stage.show(); scene.cursorProperty().bind(choiceBoxRef.getSelectionModel() .selectedItemProperty()); } public static void main(String[] args) { launch(args); } }上面的代码生成以下结果。 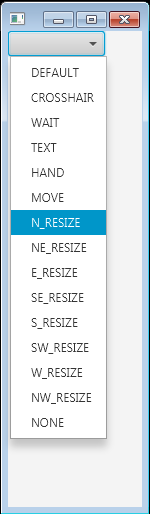
|
【本文地址】
公司简介
联系我们